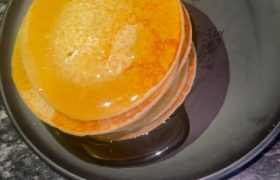
Quick, soft and pleasantly sweet — pancakes reimagined with Green Unison corn flour. This post shares a simple recipe that produces light, fluffy pancakes with a clean corn flavour, honest tasting notes from our reviewer, and clear links so you can order the exact products shown.
Simple Corn-Flour Pancake Recipe
Makes: 8–10 medium pancakes | Prep & cook: ~10 minutes
In a bowl, sieve the wheat flour and add the corn flour. Add sugar, baking powder and a pinch of salt. Whisk to combine and remove any lumps.
In a separate bowl, whisk the egg with the milk and oil.
Pour the wet mix into the dry mix and whisk gently until you have a thick, smooth batter. Rest 5–10 minutes to let the flours hydrate.
Heat a frying pan on medium and grease lightly. Pour the batter (about ¼ cup per pancake). Wait for bubbles to form on the surface and the edges to look set, then flip and cook until golden.
Stack, drizzle with honey and enjoy.
Tip: If the batter feels too thin, add a dash more corn flour. If too thick, loosen with a splash of milk. Aim for a thick, smooth, consistent batter before cooking.
Why Green Unison corn flour works so well
Natural sweetness: corn adds a pleasant, subtle sweetness so you can reduce added sugar.
Fine milling → smooth batter: Green Unison corn flour blends easily, producing a silky, lump-free batter that cooks into a tender pancake.
Fluffy texture: with the right leavening (baking powder) and a gentle whisk, pancakes rise light and airy.
Versatile: use on its own for gluten-free pancakes or blend with plantain flour for extra softness.
Honest tasting notes from the reviewer
“Very fluffy inside.” “Just clean and natural flavour.” “No lumps no aftertaste.” “corn flour blends so with batter.”
These short comments reflect what we experienced: a golden stack that tastes naturally sweet and finishes cleanly on the palate.
Mornings can be wild. Between traffic, school runs, work, and everything in between, a proper breakfast often loses the battle.
If you’re tired of skipping breakfast – or you’re bored of the same bowl of oats – this creamy Smooth Plantain Flour breakfast porridge is for you. It’s ready in about 10 minutes, uses things you already have at home, and turns one of your favourite pantry staples into a warm, satisfying bowl.
In this guide you’ll learn:
why plantain flour works brilliantly as breakfast, not just swallow
the exact step-by-step recipe for a 10-minute power porridge
topping ideas to keep things interesting all week
how to shop the ingredients quickly if you don’t already have them
This article is for general food inspiration only and is not nutrition or medical advice.
Why plantain flour works for breakfast
Smooth Plantain Flour from Green Unison is made from 100% unripe plantains, gently dried and finely milled, with no additives. It’s naturally gluten-free and grain-free, and provides complex carbohydrates, potassium and resistant starch.
In everyday language, that means a plantain-based porridge can help you:
feel more satisfied than a sugary snack
enjoy the familiar comfort of pap or custard
still keep things relatively light and simple
Because the flour is milled very finely to make smooth amala ogede without sieving, it also blends quickly into hot liquid – perfect when you only have a few minutes.
½ cup (120 ml) milk of choice – dairy or plant-based
or use all water if you prefer
Small pinch of salt (optional)
To sweeten (pick one)
1–2 teaspoons honey or date syrup
or 1 ripe banana, mashed into the bowl
Toppings (mix and match)
Sliced banana or other fresh fruit
A small handful of roasted groundnuts or any nuts you like
A sprinkle of seeds (e.g. sesame, sunflower, pumpkin)
A pinch of cinnamon or grated nutmeg
Method (ready in about 10 minutes)
Make a smooth plantain paste (2 minutes)
Add the plantain flour to a small bowl.
Whisk in 3–4 tablespoons of cool water to form a smooth, lump-free slurry.
Heat your liquid (3 minutes)
Pour the remaining water and milk into a saucepan.
Add the pinch of salt if using.
Bring to a gentle simmer over medium heat.
Cook the porridge (3–4 minutes)
Once the liquid is steaming, reduce the heat to low.
Slowly pour in the plantain slurry while whisking continuously.
Keep stirring as it thickens. Within a few minutes you should have a creamy, spoon-coating porridge.
If it becomes too thick, add a splash of hot water or milk and whisk until smooth again.
Sweeten and serve (1–2 minutes)
Take the pot off the heat. Stir in honey, date syrup or mashed banana to taste.
Pour into a bowl and add your favourite toppings: groundnuts for crunch, slices of banana, a sprinkle of seeds, or a dusting of cinnamon.
That’s it – a warm bowl of plantain power porridge in the time it takes some people to make a cup of tea.
Easy variations to keep breakfast exciting
Once you’ve nailed the basic method, you can tweak the bowl to suit your mood and what you have at home.
1. Nutty energy bowl
Stir 1 tablespoon of peanut butter or groundnut paste into the porridge right at the end.
Top with chopped roasted groundnuts and banana slices.
This adds extra creaminess and a satisfying nutty taste, pairing nicely with the mild flavour of unripe plantain flour.
2. Coconut & cinnamon “weekend treat”
Replace half the milk with coconut milk.
Add a pinch of cinnamon or nutmeg while the porridge cooks.
Finish with toasted coconut flakes and a drizzle of honey.
You get a fragrant, dessert-like porridge that still leans on familiar pantry staples.
3. Plantain–corn swirl bowl
If you love pap and tuwo, this is a fun twist that pulls both worlds together.
Cook your plantain porridge as above, but a little looser.
In a separate mug, whisk 1 tablespoon of Green Unison Silky Corn Flour into 2–3 tablespoons of water to form a smooth slurry.
Stir the corn flour slurry into the hot plantain porridge and simmer for another minute until thick and silky.
The result is a plantain–corn hybrid porridge with the nostalgia of pap and the extra body of plantain flour. Use Green Unison’s finely milled corn flour for a smooth, lump-free result: https://greenunison.com/product/nature-powered-corn-flour/
How much Smooth Plantain Flour do I need?
For a creamy single-serve breakfast bowl:
3–4 tablespoons Smooth Plantain Flour is usually enough for one adult, depending on how thick you like it.
A 1 kg pouch can give roughly 40 bowls at 25 g (about 3 tablespoons) per serving, so it stretches nicely for regular weekday breakfasts.
If you’re feeding children or someone with a smaller appetite, simply halve the quantities and loosen the porridge with more water or milk.
Frequently asked questions
Is this porridge gluten-free?
Smooth Plantain Flour from Green Unison is made from 100% unripe plantain with no wheat added, so it is naturally gluten-free.
If you need to avoid gluten for health reasons, always check the full product label and speak with a qualified health professional for individual advice.
Can I make it with only water?
Yes. Using only water gives a lighter, more pap-like porridge. Using some milk makes it richer and creamier. You can also add a splash of evaporated milk or coconut milk on top when serving.
Can I meal-prep this?
Plantain porridge is best eaten fresh, but you can:
pre-mix dry ingredients (plantain flour plus spices) in jars,
or cook a batch and reheat gently with a splash of water or milk, whisking to smoothen again.
Where to buy Smooth Plantain Flour and Corn Flour
Ready to try this 10-minute power breakfast?
Smooth Plantain Flour (Elubo Ogede) – finely milled, no sieving needed, great for swallow, porridges, smoothies and baby foods: https://greenunison.com/product/nature-powered-plantain-flour/
Silky White/Yellow Corn Flour – quick-cooking, naturally gluten-free corn flour for tuwo, pap-style bowls and rustic baking: https://greenunison.com/product/nature-powered-corn-flour/
Browse the full flour range in the eShop: https://greenunison.com/shop/
Order in a few taps
Prefer to order through chat rather than the website?
WhatsApp catalogue: https://wa.me/c/2348103043789
Chat directly to order Smooth Plantain Flour (pre-filled message): https://wa.me/2348103043789?text=Hi%20Green%20Unison%2C%20I%27d%20like%20to%20order%20Smooth%20Plantain%20Flour%20for%20breakfast%20porridge.
Just tap send, confirm your pack size, and the team will guide you through delivery options.
Some mornings, you blink and it’s already almost time to step out.
You want something warm, filling and a little bit special – not just dry bread and margarine again – but you don’t have 45 minutes to start making a full spread.
That’s where these 10-minute banana groundnut pancakes come in. 🥞✨
They use everyday pantry staples, are naturally sweetened with ripe banana, and get a gentle protein boost from groundnut flour – so breakfast actually feels satisfying, not “snack level”.
Why quick, healthy pancakes are everywhere right now
Look around online and you’ll notice the same pattern:
Short, step-by-step breakfast videos.
Recipes with 5–7 ingredients you can recognize.
A big shift toward high-protein, high-fibre breakfasts that keep you full longer.
People are busy, but they still want:
Comfort food (hello, pancakes 🥞)
Without a heavy sugar crash
And without complicated, imported ingredients
This recipe is built around exactly that: simple, familiar ingredients you probably already have at home, plus a few natural upgrades from the Green Unison eShop.
What makes these pancakes feel “healthier” than the usual ones?
This is still breakfast, not medicine – so we’re focusing on balance and better choices, not perfection.
Here’s what’s different:
1. Natural sweetness from ripe banana
Instead of loading the batter with sugar, we let a ripe banana do most of the sweetening.
You still get a soft, sweet pancake – but the sweetness comes packaged with fibre, potassium, and flavour, not just empty calories.
You can always drizzle a little honey or date syrup on top if you like things sweeter, but the base recipe is already quite pleasant on its own.
2. Extra protein and nuttiness from groundnut flour
Finely milled so it mixes smoothly into batters and drinks
Traditionally used in soups, smoothies and “energy” snacks
In this recipe, it does two important jobs:
Adds that toasty, nutty flavour that banana loves.
Gently increases the protein so breakfast feels more substantial.
Many people find that breakfasts with some protein and fibre help them stay satisfied for longer and reduce mid-morning “what can I snack on now?” moments.
3. Option to swap in local whole-grain flours
You can use regular wheat flour if that’s what you have – but to keep things closer to whole foods, you can also swap in some of Green Unison’s flours:
Smooth Plantain Flour (Elubo Ogede) Naturally gluten-free, made from 100% unripe plantain, and finely milled. It’s usually used for amala ogede, but also works nicely in pancakes as a partial flour replacement.
Silky White/Yellow Corn Flour Finely milled Nigerian corn flour that mixes lump-free and adds a gentle corn flavour.
For this recipe, the base is simple:
Wheat flour for structure (or a mix of wheat and plantain flour)
Groundnut flour for flavour + protein
Banana for sweetness
Egg for binding
You can adjust the mix depending on what’s in your kitchen.
10-Minute Banana Groundnut Pancake Recipe
Serves: 1–2 (about 6 small pancakes) Total time: About 10 minutes (including mixing and cooking)
Ingredients
Wet ingredients
1 ripe banana, medium (the more spotted, the sweeter)
1 egg (or flax “egg” – see notes below)
1/4 cup milk (dairy or plant-based)
1 teaspoon vegetable oil or melted butter for the batter (optional, for tenderness)
Gently add the dry mix into the wet mix and fold until just combined.
The batter should be slightly thick but still pourable. If it looks too thick, add a splash more milk. If it looks watery, sprinkle in a little more wheat or plantain flour.
Step 2 – Heat the pan (1 minute)
Place a non-stick pan or flat frying pan on medium heat.
Allow it to warm up, then add a small teaspoon of oil or butter and swirl to coat the surface lightly.
You want the pan hot enough that a drop of batter sizzles gently but doesn’t burn immediately.
Step 3 – Cook the pancakes (5–6 minutes)
Scoop about 2 tablespoons of batter per pancake onto the pan.
Let it cook for 2–3 minutes, until:
You see small bubbles on the surface, and
The edges look slightly set.
Gently flip with a spatula and cook the other side for another 1–2 minutes until golden brown.
Because of the banana and groundnut flour, these pancakes brown a bit faster than plain ones, so keep the heat at medium rather than high.
Repeat until all the batter is used, adding a few drops of oil between batches if needed.
Step 4 – Serve and enjoy
Stack the warm pancakes on a plate and add your favourite toppings:
Sliced banana or other fruit
A light drizzle of honey or date syrup
A spoon of yogurt and a sprinkle of chopped roasted groundnuts for crunch
Serve immediately for the best texture – soft inside, gently crisp at the edges. 🥞💛
Ingredient swaps and variations (using what’s in your kitchen)
The aim is to work with what you already have, while giving gentle upgrades.
If this recipe sounds like something you’d actually make on a busy morning, here’s how we can help you get started quickly:
📦 View products and prices at a glance: Open our WhatsApp catalog to see all flour and pantry options in one place.
💬 Chat with us on WhatsApp for help choosing products: Tap below to send us a message and we’ll guide you on what to order for these pancakes and other quick breakfasts: Chat with Green Unison on WhatsApp
When you try the recipe, feel free to share a photo and tag us – we love seeing real breakfasts made with our farm-powered ingredients.
Here’s to warm, nourishing pancakes that actually fit into real-life mornings. 🥞💚
If you grew up snacking on hot roasted groundnuts, you already know how addictive that crunch can be.
What many people don’t know is that you can get that same street‑style flavour at home without sand, without an oven, and without stress — just a pan and a little garri.
In this guide, we’ll walk through a simple, local way to roast groundnut with garri, using everyday tools. We’ll also share practical tips on how to keep it crunchy, how to reuse the garri, and how to store the nuts so they stay fresh for longer.
Measure out about 2 cups of groundnuts into a bowl.
2. Salt soak with hot water
Add 1–2 tablespoons of salt over the groundnuts in the bowl.
Pour enough hot water to fully cover the nuts.
Stir so the salt distributes evenly.
Let the groundnuts soak for about 5 minutes.
This quick soak lets a little salt enter the skin and helps the nuts roast more evenly.
If you prefer very lightly salted groundnuts, use less salt or rinse an extra time later.
3. Rinse and drain
Pour the groundnuts into a sieve or colander.
Rinse briefly under clean water to remove excess surface salt.
Shake the sieve gently to remove as much water as possible.
At this stage, the nuts should be damp but not dripping.
4. Pre‑dry on a tray (sun or fan)
Spread the damp groundnuts out in a single layer on a flat tray or wide plate.
If there is good sunlight, sun‑dry for about 2 hours.
If the weather is dull, place the tray in a well‑ventilated spot and let a fan blow over it.
You’re not trying to fully dry them like raw nuts again — just enough so they are no longer wet on the surface. Slightly moist inside, dry on the outside, is perfect for even roasting.
You’ll know they’re ready when:
The skins no longer look shiny‑wet.
The nuts separate easily when you run your fingers through them.
5. Preheat the garri
Place a dry frying pan on low heat.
Pour in ½–1 cup of garri, depending on the size of your pan and the quantity of groundnuts. The nuts should sit inside the garri, not on bare metal.
Stir for a minute or two to warm the garri.
The garri should feel hot when you hover your hand above it, but it should not be browning yet.
6. Add the groundnuts
Gently pour the prepared groundnuts into the pan of hot garri.
Immediately start stirring and folding so that:
Garri covers the groundnuts.
The nuts are constantly moving and not sitting on one spot.
Think of it as shallow‑frying in dry garri instead of oil.
7. Stir, rest your hand, then stir again
This is the part your arm will remember.
Keep the heat low to medium‑low.
Stir continuously for a few minutes.
You can rest your hand for about 5 seconds, but don’t walk away — return to stirring so nothing burns.
Low, steady heat + frequent stirring = evenly roasted nuts and garri that doesn’t burn before the nuts are ready.
You’ll start to hear gentle popping sounds and smell that familiar roasted aroma.
8. Watch the colour
As the nuts roast:
The groundnut skins shift from a raw, pale tone to a light golden‑brown.
The garri also changes colour, picking up some of the oil and colour from the nuts.
A good rule of thumb from the kitchen:
Your groundnut is ready when the garri is roughly the same colour as the nuts.
If you like a deeper roast (more brown, more intense flavour), keep going for a few extra minutes, still on low heat, stirring consistently.
9. Take off the heat and separate
Once you’re happy with the colour:
Turn off the heat.
Pour the contents of the pan into a dry sieve placed over a bowl or tray.
Shake gently so the garri falls through and the groundnuts stay in the sieve.
Spread the hot groundnuts on a tray so they can cool quickly and evenly.
Important: They will feel slightly soft while still hot. Don’t panic — they get crunchier as they cool down.
10. Let them cool completely
Allow the roasted groundnuts to cool down completely at room temperature.
This can take 20–30 minutes depending on the room temperature and the amount roasted.
Avoid covering them while they are still hot — trapped steam can soften them again.
Once cool, taste a few. If they taste slightly under‑roasted for your liking, you can return them to the pan with a little fresh garri and roast for a few more minutes.
11. Peel (optional) and clean
If you like skinless groundnuts:
Rub small handfuls between your palms to loosen the skins.
Gently blow away the chaff outside or over the sink, or use a fan to help separate skins from nuts.
If you don’t mind the skins, you can skip this step completely and enjoy them as‑is.
12. Store in an airtight container
Transfer the fully cooled roasted groundnuts into a clean, dry, airtight container:
A glass jar with a tight lid
A food‑grade plastic container
Or resealable pouches
Store in a cool, dry place away from direct heat and strong smells.
For best flavour, aim to finish a batch within 2–3 weeks. If you’re roasting a lot at once, you can keep part of it in the freezer in a well‑sealed container and bring it out in small portions.
What about the garri — can you reuse it?
Yes, you can reuse the garri for another roasting session as long as:
It hasn’t burned.
It’s not full of groundnut skins or debris.
It’s been stored in a clean, dry container after cooling completely.
Simply cool the garri, sieve out loose skins or burnt particles, and keep it airtight until the next time you want to roast.
To keep things simple and hygienic, it’s best to reuse this garri mainly for roasting, not for drinking or soaking as regular garri.
Pro tips for consistently crunchy groundnuts
Low heat is your best friend. High heat will burn the outer layer before the inside cooks.
Don’t overload the pan. Roast in batches if you have a small pan.
Listen for the pops. Gentle popping and a strong roasted aroma usually mean you’re close.
Remember the cool‑down effect. If they are already very crunchy while hot, they may end up too hard when fully cool.
Salt carefully. You can always sprinkle a little fine salt after roasting; it’s harder to fix “too salty”.
Quick ways to enjoy your roasted groundnuts
Once you’ve nailed this method, the options are almost endless:
Snack on them plain or lightly salted.
Pair them with chilled soaked garri, sugar and milk if you like.
Sprinkle over salads or grain bowls for extra crunch.
Blend into quick homemade peanut butter.
Use them as a base for sauces and soups.
And because you roasted them yourself, you know exactly how they were handled from start to finish.
FAQs
1. Do I still need to sort Green Unison groundnuts before roasting?
Both work. Use plain garri without sugar, milk, pepper or flavourings. The colour of the garri doesn’t affect the method — only the final shade, and even that is minor.
3. Can I use this method without sun‑drying?
Yes, but you still need to get surface moisture down.
If the sun isn’t strong, spread the soaked nuts on a tray near a fan or in a breezy spot until they stop looking wet. Going straight from water to pan makes them steam instead of roast.
4. Can I roast groundnuts in a non‑stick pan?
Yes, as long as you:
Keep the heat low to medium‑low.
Use only wooden or silicone utensils that are safe for your pan’s coating.
Avoid scratching the surface while stirring.
5. Is this method suitable for people with peanut allergy?
No. If you or anyone around you has a peanut or nut allergy, this snack is not suitable. Always follow medical advice and keep roasted groundnuts away from anyone who is allergic.
Ready to try it?
If you’re excited to test this method, start with groundnuts that are already clean and roast‑ready: